RECEIVERS AND SURROUND SOUND PROCESSORS (SSP's):
The surround sound receiver acts as the hub of all activity in a home theater. It is responsible for switching, processing and otherwise manipulating the audio signals from the various source components; switching video signals from video sources; driving the numerous speakers; and providing a central user interface for operating the system. When you consider that systems today can include one or more DVD players, a cable or satellite box, a VCR or DVD-R, a CD player, a media server or MP3 player, one or more game consoles, and an HD-DVD or Blu-ray player, that add up to a lot to keep track of, for both the receiver and the user. The first step in discussing receivers is going to be a description of what a sophisticated receiver may be able to do. Inexpensive receivers will omit some (possibly many) of these features.
As I proceed through this guide (both in this section and in others), I will use the term "receiver" to cover both the typical surround sound receiver and the surround sound processor (SSP). An SSP is similar in concept to a receiver, but omits the amplifiers that power the speakers. Instead, separate power amplifiers (either a single multichannel amp or a number of stereo and monoblock amps) are connected to the SSP's outputs and provide power for the speakers. This approach avoids potential problems with interference or noise produced by the amps' high voltages because the amps are removed from the chassis entirely. Another benefit to the "separates" approach (a term carried over from two-channel audio world, referring to the separate pre-amp and amp) is the ability to upgrade the SSP due to advancements in surround processing modes or video switching while retaining the amplifiers.
Audio and Video Switching:
The oldest requirement of a receiver or pre-amp (the two-channel predecessor to today's surround processors) is source switching. When all sources provided stereo analog signals, this was pretty straightforward – connect the left and right channels, pick the input, and you're done. As audio sources have grown more complex and video sources have entered the equation, this has gotten much more complex. The Cables section offers some good visual aids for these connections, but for the moment we're going to talk about what gets used where.
There are several possible audio inputs that need to be understood. The "old standby" of the "red and white" connections – analog stereo – is still around, but it's used less and less. VCR's and cassette decks still use it, but aside from that there's not much that uses it. Turntables also use a connection that appears identical to analog stereo, but don't be fooled. Turntables require a phono input – a stereo analog input that passes through a phono pre-amplifier to boost the signal to a level equivalent to a normal analog stereo signal. Phono inputs have become very rare, but if your receiver lacks one you can purchase a separate phono pre-amp. If you do have a phono input, do not try to use it for other sources. A newer connection that has become much more widely-used than analog stereo is TOSLINK digital audio, using either a coaxial or an optical connection. The two are essentially interchangeable, and they are used by DVD players, digital and HD cable boxes, satellite receivers, over-the-air HDTV receivers, game consoles, and most CD players. A digital connection of this type allows the original digital audio data (called a bitstream, since the original data bits are streamed over the connection without any alteration at the source) or a newly-generated digital signal (such as those created by some digital cable boxes for legacy analog stations) to reach the receiver. While a TOSLINK connection (coaxial or optical) has replaced stereo analog as the primary audio source, there are a few alternate audio connections that can crop up in certain cases. One is "big brother" to the old stereo analog audio: multichannel analog audio. A multichannel analog audio connection was originally six channels (left, right, center, left surround, right surround, and subwoofer) and allowed receivers that lacked Dolby Digital or DTS decoders to work with DVD players that had the decoders built in. This arrangement was subsequently used for both DVD-Audio and SACD (two high-resolution audio formats conceived of as replacements for the CD, which we discuss in greater detail in the DVD section), since for several years those formats were forbidden from using a digital audio output due to concerns about piracy. (The standard digital audio connection eventually approved for both DVD-Audio and SACD is IEEE-1394, also called FireWire or iLink, but FireWire has not seen widespread adoption because both formats have failed to achieve any significant market penetration.) Beginning in 2006, multichannel analog has expanded to eight channels with the addition of left and right surround back channels. This has been done to allow support for the new 7.1 audio formats included on Blu-ray and HD-DVD discs. Also routinely associated with Blu-ray and HD-DVD (although it came about independently and was subsequently adopted by the two formats) is HDMI – a combined digital audio/video format that is capable of carrying digital audio bitstreams including PCM stereo (CD's), Dolby Digital, DTS, and multichannel PCM (up to eight channels). Version 1.1 of HDMI added support for a digital bitstream from DVD-Audio, and version 1.2 added similar support for digital audio from SACD. Version 1.3 is expected to allow support for bitstreams from Dolby Digital Plus, DTS-HD, and Dolby TrueHD, but for the current versions (v1.2 was officially ratified in August 2005) the only way to carry the new audio formats is as eight-channel PCM. This means that the player has to decode the original bitstream but doesn't have to convert the data from analog to digital. HDMI support is currently very spotty due to the ongoing revisions to the standard and the limited number of available sources – several products that currently offer HDMI do so only for video switching and can't accept the included audio signal.
That's a lot of different audio inputs to deal with. In most cases, though, you'll be using either stereo analog or TOSLINK digital. Video is just as complex, and you're a bit more likely to run into multiple different video connection types. As with audio, we have the options of both analog and digital video. As switching has evolved, we've also seen transcoding between connection types. Before we get into that, though, we need to discuss the different types. First is composite video (the "yellow" connection from the VCR days), which is the most basic of analog video connections. This is all that the typical VCR offers. Next up is s-video, which splits luminence (brightness) and chroma (color) into separate signals within a single cable. You can get s-video on Super-VHS players, DVD players, digital cable and satellite boxes, and a number of other sources. S-video is a definite step up from composite, so use it if you've got it and don't have something better. What's better? That brings us to component video. The name is similar to composite, but similarities begin to end there. Component video uses three cables (each typically terminated with an RCA plug, although you may occasionally see them using BNC connectors) to carry the video signal. This connection supports up to 1080i resolution, which means it's the only standard analog video connection that works with progressive scan DVD and HD signals. You must have a component video input on your TV to use this format, and you will only be able to use progressive scan or HD signals if you have an HDTV. More and more receivers are supporting transcoding, or conversion of composite and s-video signals to component video. This makes video switching significantly more useful, as it allows a single component video output from the receiver carry the video from all composite, s-video, and component video inputs – meaning you never have to change the TV's input.
Digital television (one piece of the puzzle required to achieve high definition television) has led to a new set of video connections: digital connections. The first digital video connection to show up was DVI (also called DVI-HDCP because it was normally implemented with HDCP – high definition copy protection – included). DVI was originally developed for the computer industry to provide a digital video interface with LCD flat panel monitors. It was borrowed for consumer electronics, where it was partnered up with HDCP. DVI has since been largely eclipsed by HDMI (high definition multimedia interface). We've already discussed HDMI above, since it can also serve as a digital audio input. HDMI requires HDCP for security and uses the same video signal format as DVI – for video purposes, the two are interchangeable with a simple adapter or a cable terminated with DVI on one end and HDMI on the other. Typically, receivers that offer DVI or HDMI switching lack transcoding between analog video signals and digital. Since most TV's only offer a single DVI or HDMI input, however, switching at a receiver can be very handy – especially with the growing number of DVI/HDMI sources (upsampling DVD players, HD cable and satellite receivers, HD-DVD/Blu-ray players). For more information on HDMI, check out my HDMI FAQ.
When figuring out what video connections to use, always start at the end: your television. Identify the best video connection(s) available to you and make that your priority. If you have an HDTV, you will want to use component video or DVI/HDMI for every source possible, and if possible you'll want to transcode composite and s-video inputs to component for convenience. If you are using a standard definition analog TV, you may still have component video (although it will be limited to 480i), and in that case you'll still want to use component for as much as possible. Older standard definition TV's will only offer composite or s-video connections, in which case s-video is probably the preferred route. Most receivers will transcode between composite and s-video, so you can still use your receiver's switching to run a single s-video cable to the TV and feed both s-video and composite video inputs to the receiver. If you don't have any connections on your TV except for an RF input for antenna and analog cable, then you will need an RF modulator (see my Cables and Sample Wiring Diagrams sections for more details on RF inputs and modulators). In that case, you can probably simply run composite from all of your sources to the receiver and then run a composite video monitor output from the receiver to the modulator.
Surround Processing:
One of the things that helps separate a modern surround receiver from its stereo predecessors is the host of digital audio processing tools that it provides. Once you move from stereo to surround, there are a number of new factors to consider. There are all these extra speakers to figure out and hook up. Because of all of these speakers, you need to include additional calibration steps – each speaker will be a different distance from the listening position, requiring adjustment to insure that all of the speakers' outputs reach that point at the same moment; each speaker's output will need to be adjusted slightly to make sure that no speaker plays louder or quieter than any other; and speaker's low frequency limits will need to be coordinated with the subwoofer. In addition to these setup issues, there's a lot of options available in the form of different surround processing modes.
We are all familiar with the traditional left and right speakers. Your TV may even offer that. Home theater takes those two speakers and starts adding to them. There's a center channel speaker (normally found on top of or directly below the television), used mainly for anchoring dialog to the screen – because this speaker gets almost all of the dialog, it is at least as important as the left and right channels. Then there are side surround speakers. These are the two "rear" speakers introduced by Dolby's Pro Logic surround decoding back in the 1990's, and they are supposed to be located directly to the left and right of the listening position. Recently, those two surrounds have been joined by a pair of true "back" speakers: the left and right surround back speakers (or rear surround speakers). These first came about as a single surround back signal created from the left and right side surrounds using Dolby Digital EX or DTS ES decoding, but they were often installed as a pair. The two didn't get discrete left and right signals until Dolby Pro Logic IIx arrived (unless you count the proprietary Logic7 decoding developed by Lexicon). There's also a subwoofer for low frequency kick. These various channels are routinely identified using a numbering scheme that you may have seen before. Each speaker is counted as a "one" except for the subwoofer, which is ".1" because it only gets a signal covering a narrow range. So when you see a system or surround soundtrack described as being "5.1" it has five full-range channels (left, right, center, left side surround, and right side surround) plus a subwoofer channel. A "2.0" soundtrack would be stereo (left and right).
Your surround receiver will offer a place for you to set the distance from the listening position to each speaker, typically in one foot increments. This is used to set the speaker delays, so that outputs from the different speakers will arrive at the same point at the same time. In some cases, this is set by specifying delays in milliseconds. One millisecond is equivalent to 1.1 feet. If your receiver uses milliseconds, check the manual for instructions on how to properly set the delays – unlike units that specify the distance in feet and do the delay math for you, it will most likely involve using most distant speaker as the basis of measure and adding delay (approximately 1ms per foot) to each closer speaker so that they are "moved back" to the same distance as those most distant speakers. For setting speaker levels, it is typically easiest to use the receiver's internal test tones and an SPL meter (available at Radio Shack for around $45) to equalize all of the channels. The user's manual will typically give some direction here, but a common approach is to set the volume to a fairly high setting (0dB on the standard "reference" scale, if the receiver's volume control ranges from -60dB or so to +10dB or so), running the test tones with the meter set to "C-weighting" and "slow" response, and adjusting the trim on each to be at the same point (often 75dB).
Bass management was not something that even existed as a concept in the stereo days, but it has become a very complex and often contentious issue for surround receivers. First, we need to understand that the standard range for human hearing is from 20Hz to 20,000Hz, but most speakers cannot reproduce sound all the way down to 20Hz. This wasn't too big a deal for music, because aside from pipe organs and a few big drums there aren't any instruments capable of producing a note below around 60Hz or so. Movie soundtracks are not so restricted, and they often contain significant data down to 20Hz and even below. That's why home theater systems employ a subwoofer – a speaker designed to reproduce data over a narrow range (typically 20Hz to 200Hz). Because such low frequency data is sometimes carried by the full-range channels and because the subwoofer is readily at hand, receivers provide the ability to steer low frequency data from the full-range channels to the subwoofer. This steering is called bass management. Speakers are designated as "large" or "small" – terms that (perhaps poorly) differentiate between speakers that can or cannot play all the way down to 20Hz. Unless your speakers are real monsters of some sort, you'll typically want to set all of your speakers to small. (If you don't have a subwoofer, the mains must be set to "large" because the .1 subwoofer channel and any redirected data from other speakers will be sent to the mains.) In addition to the large/small designations, more and more surround receivers allow the user to adjust the exact point at which sound is "crossed over" from the speakers to the subwoofer. In some cases, this adjustable crossover is global (meaning that the same crossover point is applied to all small speakers). In other cases, separate crossover points can be specified for the mains, the center, the side surrounds, and the rear surrounds. The standard crossover point (selected by THX many years ago) is 80Hz. When determining what crossover point is best for your case, start at the speaker: the speaker's specifications should include either a frequency response (listed as something similar to 50Hz-20,000Hz +/-3dB) or a low frequency extension (listed as something similar to 50Hz at -3dB). The low number (50Hz in the example) is the lowest frequency tone that the speaker can reproduce before the output level drops more than 3dB below the average output level. The crossover needs to be set above this low number. Some people suggest doubling the low frequency extension to obtain the crossover point. In most cases, you probably don't need to go quite that far, but it does give you a good range of settings to test. I'd suggest setting your crossover at least 10Hz or 20Hz higher than the low frequency extension.
Before we move on to surround modes, I want to take a moment to touch on how bass management crossovers (and other crossovers in general) behave. An 80Hz crossover is not an absolute cut-off at 80Hz. Crossover circuits act as "high-pass" (allowing data above the crossover point to pass) or "low-pass" (allowing data below the crossover point to pass) and a bass management crossover actually uses one of each to divide the original signal into two signals. Each crossover circuit has a characteristic slope that defines how the signal is passed. As an example, an 80Hz high-pass crossover would allow all data above 80Hz to pass without alteration, but it would begin to reduce the signal's level starting around 80Hz and rapidly decrease the level of signals below that point until there was nothing left – but it may take until 70Hz or even lower before the signal disappeared. I put together a test disc (called Gonk's Devious Tiny Disc, or the DTD for short) that can be used to verify how a crossover is working if you want to tinker with your receiver's bass management.
The purpose of this section was to talk about surround processing, but so far we haven't spoken specifically about it. That's about to change, as we're going to look at all of the common surround processing modes. We kicked some of these around in Terms and Technology, but it's so relevent to this discussion that we'll spell them out here. Any current surround receiver will include most of the processing modes listed here. THX, Logic7, Dolby Digital Plus, DTS-HD, and Dolby True HD are the only ones that would not be considered standard, but they are still likely to come up at times.
One aspect of a receiver's specifications that is always a priority is the power: how many watts can it crank out? For surround processors, that's not a factor at all because the power is coming from a seprate amplifier. For receivers, the power is often listed somewhat deceptively. The specs may promise 120 watts per channel, but the small print will point out that the 120 watts can only be produced when only one channel is being driven – when all seven are going at once, each channel may only be able to offer 75 watts. Not all receivers do this, of course. More and more, receivers from smaller brands (Outlaw, Denon, ...) are making a point to specify their receivers' power output with all channels driven.
The rear panel of most receivers includes a switch for 8 ohm speakers or 4 ohm speakers. This is because 4 ohm speakers present amplifiers with a much more difficult load, forcing amps to work harder (and generate more heat). By switching the receiver to "4 ohm" you allow the receiver to cope with the more challenging load. If you do have speakers of this type, however, you may want to look at adding some separate amplification. Receivers can be paired with separate amplifiers just like SSP's if the receiver has pre-amp outputs, and good power amplifiers are designed to deal with more difficult loads without strain. That's also why amps do not have that same 8-ohm/4-ohm switch. You can add a two-channel amp (or two single-channel "monoblock" amps) to a receiver to drive the left and right channels and let the receiver drive the remaining speakers, add three channels of amplification to drive the mains and center, or any other combination. In general, amps are available in one-channel (monoblock), two-channel, five-channel, and seven-channel configurations. Before you buy separate amplification, make sure you have pre-amp outputs – not all receivers do.
One common problem with receivers and power amplifiers is a humming noise due to conflicts with the house's electrical distribution. In some cases, this is due to noise dumped back onto the wiring by dimmer light switches or refrigerator compressors. In most cases, however, it is due to ground loops – a difference between the grounding of connected components that induces a hum in the audio signals. Ground loops can be caused by operating equipment from two different circuits that are differently grounded, but most often it is because of improper grounding of cable TV service. If unhooking your cable TV causes the hum to disappear, then you've got a grounding issue with your cable service. You can call the cable company and get them to fix the grounding at the house service, or you can pick up a ground loop isolator. Probably the best ground loop isolators on the market are from Jensen (their VRD-IFF sells for $60 and can generally fix the most stubborn ground loop without degrading the cable TV signal). Others are available from Radio Shack and from Dayton for around $10 or $15.
What To Buy?:
Ready to go shopping for a receiver or surround sound processor now? I'll offer a few possible starting points for shopping around. If it is at all possible, you should visit some specialized audio/video stores to see and hear equipment; these shops will have more knowledgeable staff and better quality gear than a large chain like Best Buy or Circuit City. They will also tend to carry familiar brands like Yamaha, Denon, or Onkyo as well as less familiar lines like Rotel, Anthem, Adcom, Integra, Parasound, B&K, NAD, Marantz, Classe, Meridian, and Lexicon. One manufacturer that I became wary of in the late '90's is Harman/Kardon (a widely-known mid-fi and hi-fi equipment manufacturer, but many of their receivers and CD changers in recent years have had quality control problems and are in many cases prone to early failure): their products generally sound very good, but I heard a fair number of horror stories in the late 1990's about reliability of their sub-$1000 receivers and was disappointed with my H/K CD changer. Their quality control seems to have improved in recent years, however, so you may want to leave them on your shopping list. If your only option is a Best Buy or Circuit City, some good lines to look at include Yamaha (they have a separate product line sold through big chains, which have different model numbers but are otherwise the same as the low- to mid-level products sold through the specialty shops), Pioneer Elite, or Sony (although I've always felt that Sony typically is somewhat overpriced for the performance and features included). Also an option worth considering is the company Outlaw Audio (www.outlawaudio.com), a new company that designs high-quality equipment and sells it online only, cutting out the middle man and allowing them to provide an excellent product and a very appealing price. Their Model 1050 was a highly-regarded receiver with excellent sound and more power than the 65W/channel rating may suggest; it has been discontinued and replaced by the Model 1070. I used a Model 1050 for a year and a half before upgrading to a SSP, and was very satisfied with it. If you are looking to go with separates, you may quickly find yourself looking at manufacturers like Rotel, Anthem, B&K, NAD, Adcom, or Outlaw (who released the Model 950 pre/pro on 2002 and replaced it in 2005 with the Model 990 and Model 970). Many of those same names will crop up when looking for amplifiers, as well. The extreme high-end of amplifiers includes names like Krell (expect to see 2-channel Krell amps with almost five-figure price tags), with names like Classe and McIntosh more common (but still expensive). If you are looking for a good, reasonable five-channel amp, you'll find yourself looking at names like ATI, Parasound, and Outlaw Audio (their Model 7500 is very similar to ATI's 1505, but at about 60% of the cost, and the seven-channel 7700 offers 200W per channel from seven channels). Lastly, whatever I or anyone else tells you, take the time to try to listen to all of the alternatives and go with the product that you are most comfortable with. For an overview of some of the common pre/pros and receivers, try my Surround Processor Chart and Receiver Chart. Both charts cover a range of options, although the receiver chart in particular is far from exhaustive. I update both charts once or twice a year. I am currently using an Outlaw Audio Model 990 pre/pro hooked up to two Outlaw Model 200 monoblock amps and an Outlaw Model 750 amp. I've posted reviews of Outlaw's Model 950, M200 amp, and Model 990.
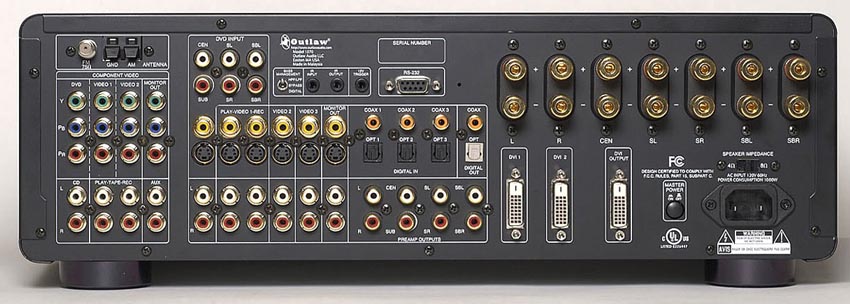
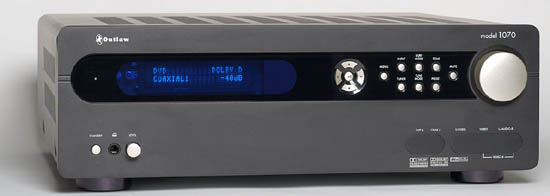
I'll leave you with this parting thought (and a picture to reinforce it): when you bring your receiver or SSP home and pull it out of the box, one of the first things you will notice (aside from the weight – good receivers are weighted down by the power supply and amplification sections, which can easily put them in the 40+ pound territory in a hurry) is that the back is covered by an uninterrupted mass of connections. It's messy, but we'll cover some ways to tame it later in the Sample Wiring Diagrams section. The picture below is of a receiver, specifically the Outlaw Model 1070.